

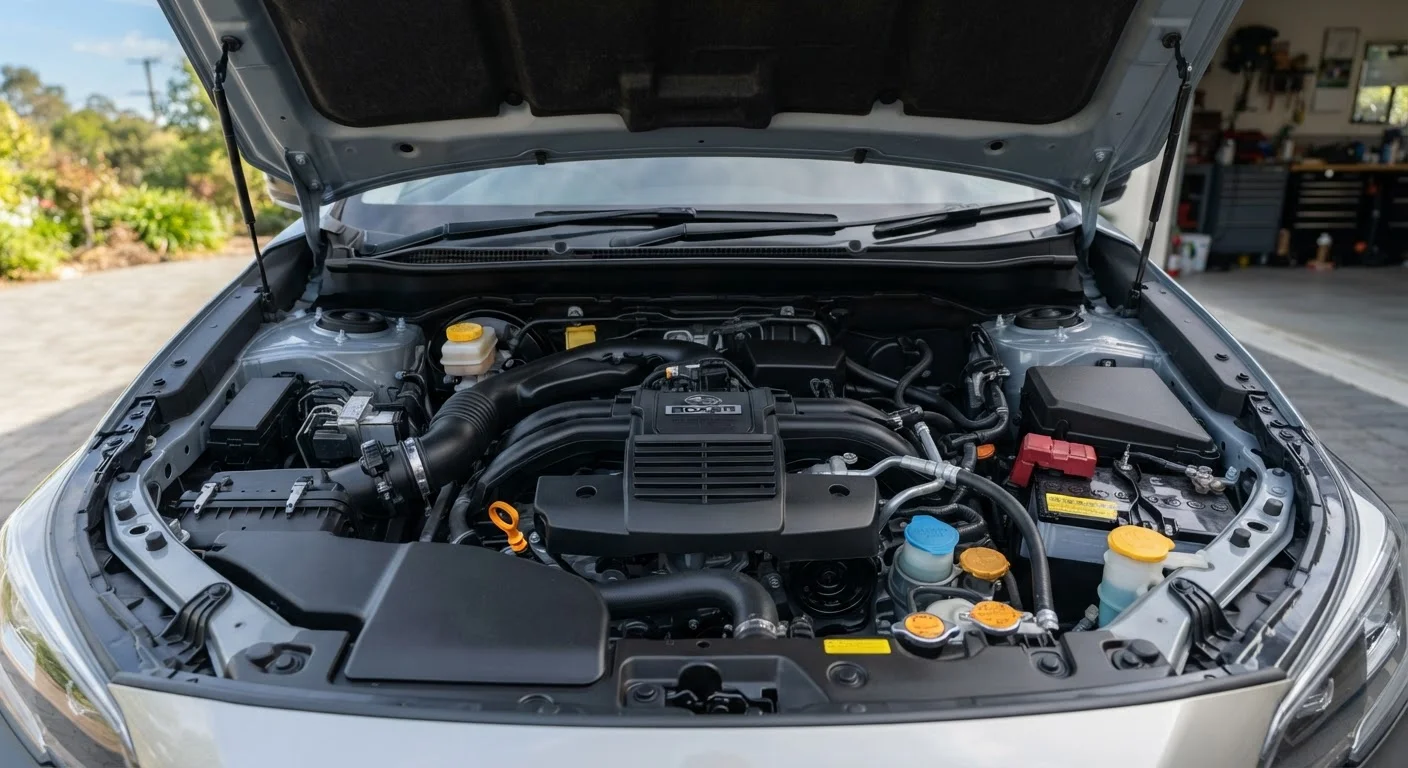
Key Takeaways
Why Fluid Checks Are the Highest-Return Task in Car Ownership
Most major mechanical failures don't arrive without warning - they follow weeks or months of a fluid that was low, contaminated, or simply past its service life. Engine seizures, transmission rebuilds, and brake system failures are expensive repairs, but they're rarely sudden. The precursor is almost always a fluid problem that went undetected.
Checking your own fluids costs nothing but a few minutes and doesn't require mechanical expertise. It's one of the clearest examples of a DIY maintenance task genuinely worth learning - no special tools, no risk of injury when done correctly, and a direct line to catching problems early.
The six fluids covered here - engine oil, coolant, brake fluid, transmission fluid, power steering fluid, and windshield washer fluid - are the ones every driver should be able to locate, read, and assess. Two of them (brake and transmission) carry enough nuance that the steps below include specific flags for when to stop DIYing and call a professional.
What you will need
What You'll Need Before You Start
Good news: this task is genuinely low-barrier. You don't need a jack, a socket set, or a service bay. What you do need is a few minutes, a cool engine, and the right reference material.
Clean lint-free rags or paper towels
Wiping dipsticks clean before re-inserting for an accurate reading.
Flashlight or phone torch
Illuminating dark reservoir areas or inspecting fluid color inside opaque tanks.
Owner's manual
Confirming the correct fluid spec, fill location, and acceptable level range for your specific vehicle.
Nitrile gloves
Protecting your hands from engine oil, coolant, and brake fluid, all of which can irritate skin.
Your owner's manual is the single most important resource here. It tells you the correct fluid specifications for your exact vehicle - important because using the wrong coolant type or transmission fluid can cause real damage. If you've misplaced your manual, most manufacturers offer a digital version on their website by entering your VIN.
Step-by-Step: Checking All Six Fluids
Work through these checks in order. Starting with the engine off and cool applies to all of them except transmission fluid on some vehicles - the step instructions will flag any exceptions.
Park on level ground and let the engine cool
Pull onto a flat surface, turn the engine off, and wait at least 30 minutes before opening the hood. Hot engines and pressurized systems are burn hazards. A level surface ensures dipstick and reservoir readings aren't skewed by an incline.
Check the engine oil
Locate the oil dipstick - typically a brightly colored loop or handle near the front of the engine. Pull it out, wipe it clean, reinsert it fully, then pull it out again. The oil film should sit between the MIN and MAX marks. Healthy oil is amber to light brown. Black, gritty, or milky oil means it's overdue for a change or may have a coolant leak - consult a mechanic.
Check the coolant (antifreeze)
Find the translucent plastic coolant reservoir - it's connected to the radiator by a hose. The level should sit between the LOW and FULL lines marked on the side. Coolant should be bright green, orange, or pink depending on the type your vehicle uses. Murky brown coolant or visible particles signal degradation. Do not mix coolant types without flushing the system first.
Check the brake fluid
The brake fluid reservoir is a small, semi-translucent container on top of the master cylinder, usually near the firewall on the driver's side. Without removing the cap, check that the level sits between MIN and MAX. Brake fluid should be clear to light yellow. Dark brown fluid absorbs moisture over time and loses effectiveness - most manufacturers recommend a flush every 2-3 years regardless of level.
Check transmission fluid (if applicable)
Many automatic transmissions have a dipstick similar to the oil dipstick; many newer vehicles seal the transmission and require a shop check. Consult your owner's manual first. If your vehicle has a dipstick, the process mirrors engine oil: wipe, reinsert, check. The fluid should be translucent red to light pink. Dark red or brown fluid with a burnt smell needs attention. Manual transmissions typically don't have a user-accessible dipstick.
Check power steering fluid (if your car has hydraulic steering)
Vehicles with electric power steering have no fluid to check - electric motors handle the assist. If your car has a hydraulic system, find the power steering reservoir (look for a steering wheel icon on the cap). Check the level against the MIN/MAX markings. Fluid should be clear to light amber. Foamy or low fluid often points to a leak; humming or heavy steering feel confirms it.
Top off windshield washer fluid
The washer fluid reservoir is usually the easiest to spot - a translucent tank with a windshield/wiper icon on the cap. Fill to the marked line using premixed washer fluid formulated for your climate. In winter, use a solution rated for below-freezing temperatures. Never use plain water, which can freeze in lines and crack the pump.
Build a Fluid-Check Habit That Sticks
The most practical cadence for most drivers: check engine oil monthly, inspect all six fluids at every fuel fill-up once per season, and do a full under-hood review before any long road trip. Linking checks to an existing habit - like a fill-up or a calendar reminder - makes it far easier to catch problems before they compound. For a complete picture of when each fluid should be serviced or replaced, see our maintenance schedule guide.
Reading the Results: What to Do After You Check
A fluid check that reveals all levels within range and colors looking healthy means you're done - close the hood and log the date. A fluid check that turns up something off is only useful if you act on it.
Low Brake Fluid Is Not a DIY Top-Off Job
Unlike washer or coolant reservoirs, the brake fluid level drops as brake pads wear - that's normal. But if pads are in good shape and fluid is still low, you likely have a leak in the brake circuit. Topping off without finding the leak source masks a potentially dangerous problem. If fluid is low and you haven't recently had brake service, have the system inspected by a qualified mechanic before driving.
Low but otherwise healthy fluid: Top off with the manufacturer-specified type and recheck in a week. If it's low again, there's a leak.
Discolored or contaminated fluid: This typically means a flush or full service is needed, not just a top-off. Milky oil, for example, can indicate coolant is entering the engine - a symptom that requires professional diagnosis.
Fluid at the right level but smelling burnt: Common with brake and transmission fluid. Level alone doesn't tell the full story; heat-degraded fluid loses its protective and hydraulic properties even when the reservoir reads full.
For a broader picture of how fluid service intervals fit into your vehicle's overall upkeep, your car's maintenance schedule explained walks through what each milestone service actually covers. And if any of your checks reveal a dashboard warning light you don't recognize, our dashboard warning light reference translates what your vehicle is trying to tell you.
Don't Mix Fluid Types Without Checking First
Using the wrong coolant, transmission fluid, or brake fluid can damage seals, degrade performance, or void manufacturer coverage. Always cross-reference the fluid type printed on the reservoir cap with your owner's manual before adding anything. When in doubt, use the exact specification listed - not whatever's closest on the shelf.
Pair fluid checks with a seasonal maintenance review and you'll have a reliable system for staying ahead of problems year-round.